I don’t know why, but I’ve been thinking about putting a proxy on my home network. Actually I do know why. It was because I tried to replace my SSG5 with a stupid ASA 5505 and wanted the web filter and inline AV scanning capability back. So I began building out a Squid server to use. The topology I had in mind would look like this:
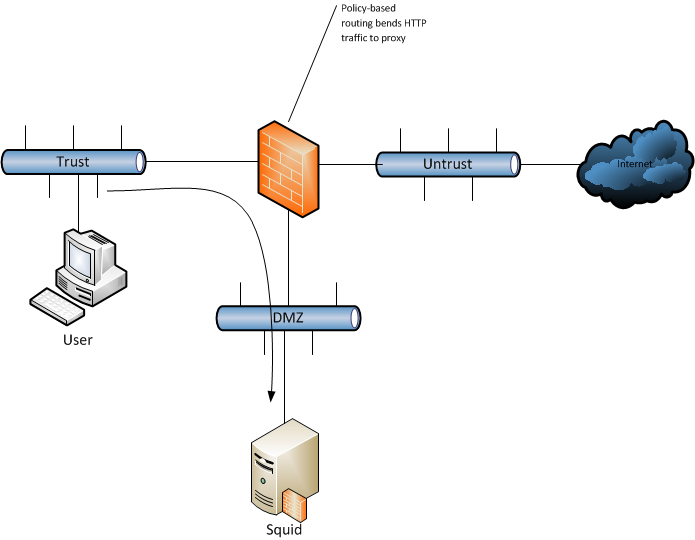
Using WCCP or policy-based routing, I would send HTTP traffic from clients in the Trust/inside zone to the proxy server on the DMZ zone and do any content filtering and AV scanning on that box. Before I go any further let me say that this project pushed me over the edge to ripping out that damn ASA. I’ve been trying to like the ASA platform for a couple months, but things that just worked on ScreenOS are either impossible or make me feel like I’m doing something dirty when I implement. On the ASAs, you can’t use WCCP to point to a proxy in another zone. That means the Squid box would reside in the Trust/inside zone. This is fine at home, but not in a business, so there’d be no point in implementing this way, as I’ll never use it anywhere else. Ok… so let’s use the old PBR way… read documentation… what’s this? Policy-based routing is not supported on the ASA platform? Bleh. I ripped out the ASA and put the SSG back in. Now I have OSPF routing through hostname based (yes, it works with dynamic addresses) VPN again as well. I also have the content filtering and inline AV scanning back. So why am I doing this again? I figure I may as well just get the transparent proxy going for kicks.
Here are the steps to get Squid 3.1.19 working on a CentOS 6.2 ESXi 4.1 Build 582267 VM using a minimal install. I’m going to assume you’ve done no configuration during the install and installed no other packages. This is all command line.
Ubuntu has another LTS release coming out in a couple months, so I didn’t want to to use the old 10.04 release. I’ve been thinking about CentOS lately just to stay familiar with RHEL/CentOS since a lot of businesses use it. Lucky for me, CentOS did a 6.2 release back in December 2011. I pulled down the ISOs and did the install.
1. Get network connectivity
vi /etc/sysconfig/network-scripts/ifcfg-eth0
Do the following to your config file:
ONBOOT="yes" #change to yes
BOOTPROTO=none #change to dhcp and stop here if dynamic; else add rest
IPADDR=192.168.1.10 #add
PREFIX=24 #add
GATEWAY=192.168.1.1 #add
DNS1=208.67.222.222 #add
DNS2=208.67.220.220 #add
DOMAIN=guammie.com #add
DEFROUTE=yes #add
Save the file and service network restart
2. Update the system
yum update
Install whatever comes up and reboot
3. Install all the packages (and their dependencies) we’ll need for this project and some other useful things not included in the base install
yum install gcc perl vim-enhanced mlocate wget make gcc-c++ libstdc++-devel cyrus-sasl-devel libcap-devel openssl-devel openssl-static openldap-devel pam-devel db4-devel db4-cxx ntp ntpdate
4. Install VMware Tools
Run the tools install in the vSphere client
mkdir /media/dvd
mount /dev/dvd /media/dvd
tar -xzf VMwareTools-8.3.12-559003.tar.gz -C /root/
perl /root/vmware-tools-distrib/vmware-install.pl
run through the installer (pretty much hit return a bunch of times)
after the installer finishes:
umount /media/dvd
vim /etc/init.d/vmware-tools
add the following so that the first 3 lines look like this and then save:
#!/bin/sh
#
# chkconfig: 345 97 13
chkconfig vmware-tools on
5. Install Squid from repository
I do this because I’m a lazy bastard. Installing from repository creates everything you need (users, startup scripts, etc) with a single command.
yum install squid
6. Upgrade Squid from source
So now you’ve got Squid 3.1.10 installed (as of 20120215). Latest version right now is 3.1.19. Let’s upgrade!
squid –v
Note those build options. We’re going to mostly use them.
wget http://www.squid-cache.org/Versions/v3/3.1/squid-3.1.19.tar.gz
tar -xzf squid-3.1.19.tar.gz
cd squid-3.1.19
./configure –build=x86_64-redhat-linux-gnu –host=x86_64-redhat-linux-gnu –target=x86_64-redhat-linux-gnu –program-prefix= –prefix=/usr –exec-prefix=/usr –bindir=/usr/bin –sbindir=/usr/sbin –sysconfdir=/etc –datadir=/usr/share –includedir=/usr/include –libdir=/usr/lib64 –libexecdir=/usr/libexec –sharedstatedir=/var/lib –mandir=/usr/share/man –infodir=/usr/share/info –exec_prefix=/usr –libexecdir=/usr/lib64/squid –localstatedir=/var –datadir=/usr/share/squid –sysconfdir=/etc/squid –with-logdir=/var/log/squid –with-pidfile=/var/run/squid.pid –disable-dependency-tracking –enable-arp-acl –enable-follow-x-forwarded-for –enable-auth=basic,digest,ntlm,negotiate –enable-basic-auth-helpers=LDAP,MSNT,NCSA,PAM,SMB,YP,getpwnam,multi-domain-NTLM,SASL,DB,POP3,squid_radius_auth –enable-ntlm-auth-helpers=smb_lm,no_check,fakeauth –enable-digest-auth-helpers=password,ldap,eDirectory –enable-negotiate-auth-helpers=squid_kerb_auth –enable-external-acl-helpers=ip_user,ldap_group,session,unix_group,wbinfo_group –enable-cache-digests –enable-cachemgr-hostname=localhost –enable-delay-pools –enable-epoll –enable-icap-client –enable-ident-lookups –enable-linux-netfilter –enable-referer-log –enable-removal-policies=heap,lru –enable-snmp –enable-ssl –enable-storeio=aufs,diskd,ufs –enable-useragent-log –enable-wccpv2 –enable-esi –with-aio –with-default-user=squid –with-filedescriptors=16384 –with-dl –with-openssl –with-pthreads build_alias=x86_64-redhat-linux-gnu host_alias=x86_64-redhat-linux-gnu target_alias=x86_64-redhat-linux-gnu CFLAGS=’-O2 -g -pipe -Wall -Wp,-D_FORTIFY_SOURCE=2 -fexceptions -fstack-protector –param=ssp-buffer-size=4 -m64 -mtune=generic -fpie -fpic’ LDFLAGS=’-fPIC -pie -z relro -z now -fstack-protector’ CXXFLAGS=’-O2 -g -pipe -Wall -Wp,-D_FORTIFY_SOURCE=2 -fexceptions -fstack-protector –param=ssp-buffer-size=4 -m64 -mtune=generic -fpie’ –with-squid=/builddir/build/BUILD/squid-3.1.19
make && make install
chkconfig squid on
7. Now we need to adjust IPTables
iptables -t nat -A PREROUTING -i eth0 -p tcp –dport 80 -j REDIRECT –to-port 3128
iptables -I INPUT 4 -p tcp –dport 3128 -m state –state NEW,ESTABLISHED -j ACCEPT
iptables -I INPUT 4 -p udp –dport 3401 -j ACCEPT
service iptables save
The first rule is necessary for the transparent redirection. The second rule is necessary just to connect at all. The third rule is for SNMP if you plan on monitoring Squid itself.
8. Edit /etc/squid/squid.conf
Here’s mine. I’ve done things like setup the HTTP intercept, added SNMP support, and some other stuff about caching Windows Updates. Other than that it’s somewhat stock.
vim /etc/squid/squid.conf
acl manager proto cache_object
acl localhost src 127.0.0.1/32 ::1
acl to_localhost dst 127.0.0.0/8 0.0.0.0/32 ::1
# Example rule allowing access from your local networks.
# Adapt to list your (internal) IP networks from where browsing
# should be allowed
acl localnet src 10.0.0.0/8 # RFC1918 possible internal network
acl localnet src 172.16.0.0/12 # RFC1918 possible internal network
acl localnet src 192.168.0.0/16 # RFC1918 possible internal network
acl localnet src fc00::/7 # RFC 4193 local private network range
acl localnet src fe80::/10 # RFC 4291 link-local (directly plugged) machines
acl SSL_ports port 443
acl Safe_ports port 80 # http
acl Safe_ports port 21 # ftp
acl Safe_ports port 443 # https
acl Safe_ports port 70 # gopher
acl Safe_ports port 210 # wais
acl Safe_ports port 1025-65535 # unregistered ports
acl Safe_ports port 280 # http-mgmt
acl Safe_ports port 488 # gss-http
acl Safe_ports port 591 # filemaker
acl Safe_ports port 777 # multiling http
acl CONNECT method CONNECT
acl monitor src 192.168.0.10/32
acl snmp snmp_community guammie
visible_hostname squid.guammie.com
#
# Recommended minimum Access Permission configuration:
#
# Only allow cachemgr access from localhost
http_access allow manager localhost
http_access deny manager
# Deny requests to certain unsafe ports
http_access deny !Safe_ports
# Deny CONNECT to other than secure SSL ports
http_access deny CONNECT !SSL_ports
# We strongly recommend the following be uncommented to protect innocent
# web applications running on the proxy server who think the only
# one who can access services on "localhost" is a local user
#http_access deny to_localhost
#
# INSERT YOUR OWN RULE(S) HERE TO ALLOW ACCESS FROM YOUR CLIENTS
#
# Example rule allowing access from your local networks.
# Adapt localnet in the ACL section to list your (internal) IP networks
# from where browsing should be allowed
http_access allow localnet
http_access allow localhost
snmp_access allow snmp monitor
snmp_access deny all
# And finally deny all other access to this proxy
http_access deny all
# Pull entire files from the start when a range is requested; for Windows Updates
range_offset_limit -1
# Google what this does. I’m too lazy to type it all out, but has to do with Windows Updates
quick_abort_min -1
# This removes proxy info from UserAgent
#via off
# Uncomment request_header and then one of the following header_replace lines to present either IE or Firefox
#request_header_access User-Agent deny all
#header_replace User-Agent Mozilla/4.0 (compatible; MSIE 8.0; Windows NT 6.1; Trident/4.0; SLCC2; .NET CLR 2.0.50727; .NET CLR 3.5.30729; .NET CLR 3.0.30729; Media Center PC 6.0; OfficeLiveConnector.1.4; OfficeLivePatch.1.3)
#header_replace User-Agnet Mozilla/5.0 (Windows; U; Windows NT 6.1; en-US; rv:1.9.2.10) Gecko/20100914 Firefox/3.6.10
# Squid normally listens to port 3128
http_port 3128 intercept
# SNMP port; 3401 is the official port
snmp_port 3401
# We recommend you to use at least the following line.
hierarchy_stoplist cgi-bin ?
# Store large objects
maximum_object_size 200 MB
# Uncomment and adjust the following to add a disk cache directory.
cache_dir ufs /var/spool/squid 4096 16 256
# Leave coredumps in the first cache dir
coredump_dir /var/spool/squid
refresh_pattern -i download.windowsupdate.com/.*\.(cab|exe|ms[i|u|f]|asf|wm[v|a]|dat|zip) 4320 80% 43200 reload-into-ims
refresh_pattern -i download.microsoft.com/.*\.(cab|exe|ms[i|u|f]|asf|wm[v|a]|dat|zip) 4320 80% 43200 reload-into-ims
refresh_pattern -i update.microsoft.com/.*\.(cab|exe|ms[i|u|f]|asf|wm[v|a]|dat|zip) 4320 80% 43200 reload-into-ims
refresh_pattern -i windowsupdate.com/.*\.(cab|exe|ms[i|u|f]|asf|wm[v|a]|dat|zip) 4320 80% 43200 reload-into-ims
refresh_pattern -i windowsupdate.microsoft.com/.*\.(cab|exe|ms[i|u|f]|asf|wm[v|a]|dat|zip) 4320 80% 43200 reload-into-ims
refresh_pattern -i ntservicepack.microsoft.com/.*\.(cab|exe|ms[i|u|f]|asf|wm[v|a]|dat|zip) 4320 80% 43200 reload-into-ims
refresh_pattern -i wustat.windows.com/.*\.(cab|exe|ms[i|u|f]|asf|wm[v|a]|dat|zip) 4320 80% 43200 reload-into-ims
refresh_pattern -i microsoft.com/.*\.(cab|exe|ms[i|u|f]|asf|wm[v|a]|dat|zip) 4320 80% 43200 reload-into-ims
# Add any of your own refresh_pattern entries above these.
refresh_pattern ^ftp: 1440 20% 10080
refresh_pattern ^gopher: 1440 0% 1440
refresh_pattern -i (/cgi-bin/|\?) 0 0% 0
refresh_pattern . 0 20% 4320
9. Start Squid
service squid start
That’s it.
References:
http://wiki.squid-cache.org/ConfigExamples/Intercept/LinuxRedirect
http://wiki.squid-cache.org/Features/Snmp
http://support.microsoft.com/kb/885819
http://wiki.squid-cache.org/SquidFaq/WindowsUpdate
http://strotmann.de/roller/dnsworkshop/entry/compiler_options_for_creating_secure
2 responses to “Transparent Squid 3.1.19 on CentOS 6.2 VM”
This squid cache s running on vmware perfect however when i do port forwarding which is open 1 port, let say HTTP then pp outside the internet almost cannot reach inside web server.
Any idea why?
Is iptables setup to allow that traffic?